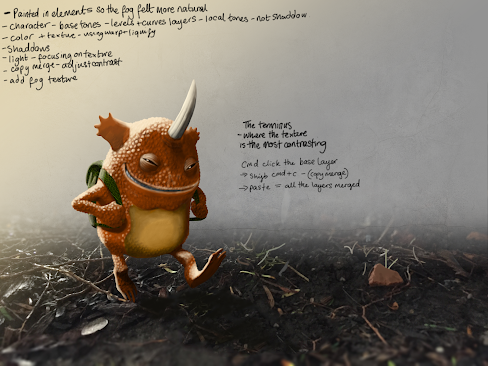
Schoolism Digital Painting with Bobby Chiu lesson 8
This lesson started with an image of a 3D sculpt, and Bobby had painted the bigger version, using the sculpt lighting as reference.
Then we went through
- Adding a gradient for the fog
- Drawing in some grass so the gradient felt more like fog and had parts of the ground breaking up the straight line of the gradient.
- Adding base tones to the skin, so making the belly a lighter tone, painting in the tone of any pattern on the skin, like a tigers stripes or a leopards spots.
- We used a curves layer and a levels layer for this
- Then we painted in the colour on a colour layer because the tones were spot on
- We used textures- first set to overlay and then changes the levels so that they weren't changing the tone of the creature, just applying a texture.
- Using the warp tool and the liquify tool we adjusted the texture so it fitted the curvature of the creature.
- We were also aware of the light direction of he texture and had to flip it horizontally for it to match the light direction in the picture.
- Then we added light onto the textures to help it look less flat, and added some darker parts back in.
- We did a copy merge (cmd click the base layer which all the clipping masks are attached to, then shift cmd c and paste.)
- Took the pasted image to the top of the layers and adjusted the contrast and opacity levels until we liked the look.
- Applied a texture to the fog
I learnt a lot through this process, particularly using the liquify tool for applying textures more realistically. Also the sequence of what was done when with this painting was really useful, and it's helping me understand what contributes to a certain look, and a polished image.


Comments
Post a Comment